Growing Hard-Shell Gourds
Gourds are a single season crop. Gardeners plant them in spring and harvest them in fall. Growing gourds is much like growing their cousins, pumpkins or squash or cucumbers. The biggest difference is that with squash and pumpkins, you harvest at a much earlier stage. And after being harvested, the green gourds must be allowed to dry out or cure.
Soil preparation
Like squash, gourds like light, well-drained soil, but will settle for less. A raised bed can help because the soil warms sooner in the spring. Gourds like a pH range of 5.8-6.2. A soil test will show whether you need to lime or make nutritional additions. Gourds are heavy feeders, and they like rich soil and will do better if planted in soil amended with compost or manure. Smaller varieties of gourds can be grown successfully in large pots or planter boxes, but will need frequent watering.
Sprouting Seeds
Line a cookie sheet with sides with layered paper towels on the bottom (4 to 5 layers). Lay the seeds on the paper towels and cover the seeds with an additional 4 to 5 layers of paper towels. Gently pour water over the paper towels until they are soaked but there is no standing water. Cover th entire cookie sheet with plstic wrap, so the moisture can’t escape, and place it on a heating pad set to low. Seed will usually start to sprout in two to three days.
Fill peat pots with planting soil. Poke three to four holes, about an inch down, and place a seed that has begun to sprout in each hole pointy side up. Set the peat pots in a baking pan and add about an inch of water to the pan.
Place the pans of seeded peat pots in a portable hot house, set the pans in the sun during the day and in the garage at night. A portable hot house is helpful for moving the pans around. Check the water level in the pan a couple times a day to make sure the peat pots are always are sitting in about a half inch of water. If you don’t have a hot house, put the peat pots in the aluminum trays that have lids that snap on.
Once the third or fourth leaf has emerged, take the trays out of the hot house and set them out on a table for a couple hours a day so the stems get strong in the breeze. After a couple of days of being out for part of the day, the seedlings are ready to plant in the ground. Plant the entire peat pot because the gourd seelings do not like their roots to be disturbed.
Make sure your gourd seeds and plante never dry out—ever!
It sounds like a lot of work but it really isn’t and it’s worth your effort!
Pollination—Gourds are self-pollinating plants
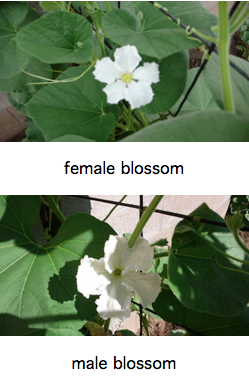
Each plant bears both male and female flowers which are white blossoms with slightly yellow centers. The male flowers appear on the vines first. You can tell the difference because female flowers have a small swollen gourd shaped “pepo” beneath petals that will develop into a gourd if pollinated. The first vine that grows will have more male blossoms than female blossoms. When that first main vine reaches about 8- 10 feet long, pinch it off a few inches from the tip. This will force development of more lateral vines which is where the female flowers will develop. Female blossoms open at night and can only be pollinated during a very limited timespan…about 48 hours. Night flying moths and insects (and industrious gourd gardeners) assure pollination by transferring pollen from male to female flowers.. Gardeners can use an artists' paintbrush or a cotton swab to gently transfer pollen. Another method is to pick off a male flower and rub its center on the center of the female blossom to transfer pollen.
Hard-shell gourds are a single season crop and will mature in about 120-140 days. In California, you can plant gourd seeds from about April through mid-June. Hard-shell gourd seeds are generally a heavy, ridged, shield shape. Soaking seeds overnight can speed germination. You can start seeds indoors in peat pots or newspaper pots to hasten the growing season. Plant 2 or 3 seeds in each pot to a depth about twice the length of the seed. Keep the soil moist. Seeds typically germinate in 8-10 days, but can sprout as long as six weeks after planting. Most early growth is underground, so don't despair if you don't see much happening the first month or so. Gourd roots are deep and wide, and do not like to be disturbed, so transplant the sprouted seedlings into the ground pot and all. All gourd vines will sprawl, they have tendrils and like to climb. If not pinched back, large varieties can grow a 30 foot-long vine in a single season. In large fields, farmers place plants 4 to 6 feet apart in rows at least 4 feet apart. But home gardeners just find a sunny spot, ideally near a fence or arbor or tree the vines can cling to and climb on. Mulch around the plants will help to hold heat and moisture and keep weeds down.
If gourd vines can climb on a trellis or arbor or fence, they are cleaner and easier to protect from insects. Gourd vines have tendrils and don't have to be trained. They climb as naturally as monkeys. Two sturdy posts, an upper and lower wire and garden twine woven between will support heavy gourds, like birdhouses. An oversized wire cage, like a large tomato cage, works for smaller gourds, like jewelry or banana gourds. Think about how heavy the mature gourds are going to be. Several dozen 10-pound bottle gourds get to be a strain on your arbor or support trellis. Very large hanging gourds like bushels or zuccas can weigh a hundred pounds or more, and may need to be tied up in panty hose or placed on a patio chair or other support.
Also, think about what you plan to do with your gourd. Young gourds are soft and pliable. When grown on the ground, the increasing weight of the gourd causes the shape to settle so the gourd has a flat bottom to sit on, and the gourd “neck” or shape may curl. A trellis-grown hanging gourd will have a straight neck and a rounded bottom, so it may not “sit” well.
Gardeners have very different opinions on fertilizer for hard-shell gourds. Some think none is best, other fertilize often, some daily with manure tea. If you amended the soil with good compost before planting, there is likely to be sufficient nutrients. Some gardeners sprinkle a handful of 10-10-10 fertilizer in a circle around the area when planting. Everybody agrees fertilizing should stop after August because that encourages leaf growth when the developing gourds should be hardening.
Harvesting and Drying
“Curing” or drying after the harvest is necessary to make the gourds ready to use for crafting. Do not harvest until the gourd ceases to grow larger because it is mature, and the stem turns brown. Allow two or three inches of vine to remain as a stem for the gourd. "My gourds rotted so I threw them away" is a common complaint from new growers. Most likely, they cut their gourds from the vine too soon. After all gourds are cut from the vines, the dry withered vines and leaves should be removed from the garden.
Handle green, heavy undried gourds gently to prevent bruising, and put them in a warm, dry airy place. Freezing won't hurt a mature green gourd, but a freeze will hurt the viability of the seeds, so they will not sprout if planted in the future. The heavy green gourds that are filled with moisture (much like a melon) will need weeks or months to “cure” depending on their size and the humidity in the drying area. Time is needed to allow all the moisture to seep out through the gourd shell. But eventually the moisture will all seep out via the shell and the gourds will be more tan than green in color, and weigh much less. When the gourd is dry enough, the seeds rattle, and the gourd is ready to use. Often mold will form on the gourd surface, which is entirely normal. But this is why some people think the gourds have “rotted.” Just leave the mold undisturbed (sometimes mold patterns are very artistic) as the gourd dries and it can be washed off after the gourd has dried. Soak the dried gourd in some water, scrub off all the mold and outer skin and it is ready to use. If you decide to cut a gourd open, be sure to wear a mask to protect from breathing in mold and gourd dust.
Some of this information was adapted from “Growing Gourds in N.C.”
Link to entry form is within the 2024 Competition rules document
2024 Comprules.pdf
Adobe Acrobat document [598.0 KB]